Monday, October 22, 2012

Living Room Space Planning and Unique Storage


Our Living Room has always been a sore spot for me as a designer. Whoever laid out the floor plan for this home made it pretty clear where the furniture was supposed to go. When you walk into the room, the left wall is clear of any obstruction, but houses the cable. The wall you are facing is a short wall and has the entry to the stairs on the left and the fireplace in the center. The right wall is a wall of windows and the other wall is a half wall open to the kitchen.

My DREAM for this space is to make the following changes EVENTUALLY--
1. Move the cable to the right of the fireplace so I will have the largest wall open for furniture

tv alcoves by fireplace
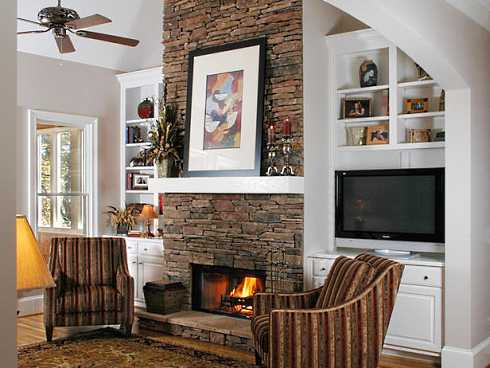
I like the TV in the alcove- not sure how it would work with our fireplace?
2. Add built ins along the half wall on the living room side for books, magazines, toys


Bookshelf instead of open railing.. you can't throw cars through a book shelf!
Built Ins 
3. Add some better draperies even though I spent forever making these PICTURE COMING SOON (they aren't thick enough and the dark color makes them a magnet for dog hair). Ick!

Iron Curtain Rod
I like the light color and simplicity of these
4. Add more seating.


Also Love this one from Room and Board
Dolce Upholstered Accent Arm Chair - Trellis
Love these- Target 

As you can see, my style is a little ECLECTIC

Well, on to what my living room looks like at the present. It is a hodge podge of items we have had and moved with us from the beginning, items we have had given to us, items we have moved from other rooms and a few that are new, but not many.

The SOFA is a greenish/brown microsuede with two seat cushions that are removable and four back cushions that are removable. I LOVE this sofa. Not only is is long enough for my husband to lay down on, but when the back pillows are removed it can serve as a single size bed for a guest. It is super easy to keep clean and is very comfortable. It was the first piece of furniture I bought when I began working as a teacher so it has been through a few moves. I bought this one when I was already dating my now husband. The stipulation for the couch was that he could stretch out on it fully and it was cheap at $600.00 which was still a lot of money for me at the time. But, it was well worth it because it has lasted. I HATE furniture up against the wall, but it works where it is now since the TV takes up our one best wall at the moment. Sigh!!

Sofa with throw pillow from Target
The oldest piece in this space I would have to say is the CEDAR Chest we use as a coffee table. It holds additional bedding and blankets that we have no space elsewhere to store. I originally believed this came from my Grandmother's house, but my mom told me recently it wasn't the same one- needless to say I was disappointed. 
Cedar Chest- really too high to serve as a coffee table, but will do for now.


The RECLINER in the corner was a fight from the beginning. It is extremely comfortable and has additional lumbar support so it's great to relax in. But, I never wanted a "fluffy" recliner. They take up a lot of space when reclined, have to fit in a corner so they can recline and in my opinion aren't that stylish. But, sometimes comfort wins over style and sometimes they go together. This chair also "fit" my husband at 6'3". Ha! Those cute chairs with the great patterns were too short for him and would not have worked.

Lazy Boy Recliner with Target throw pillow

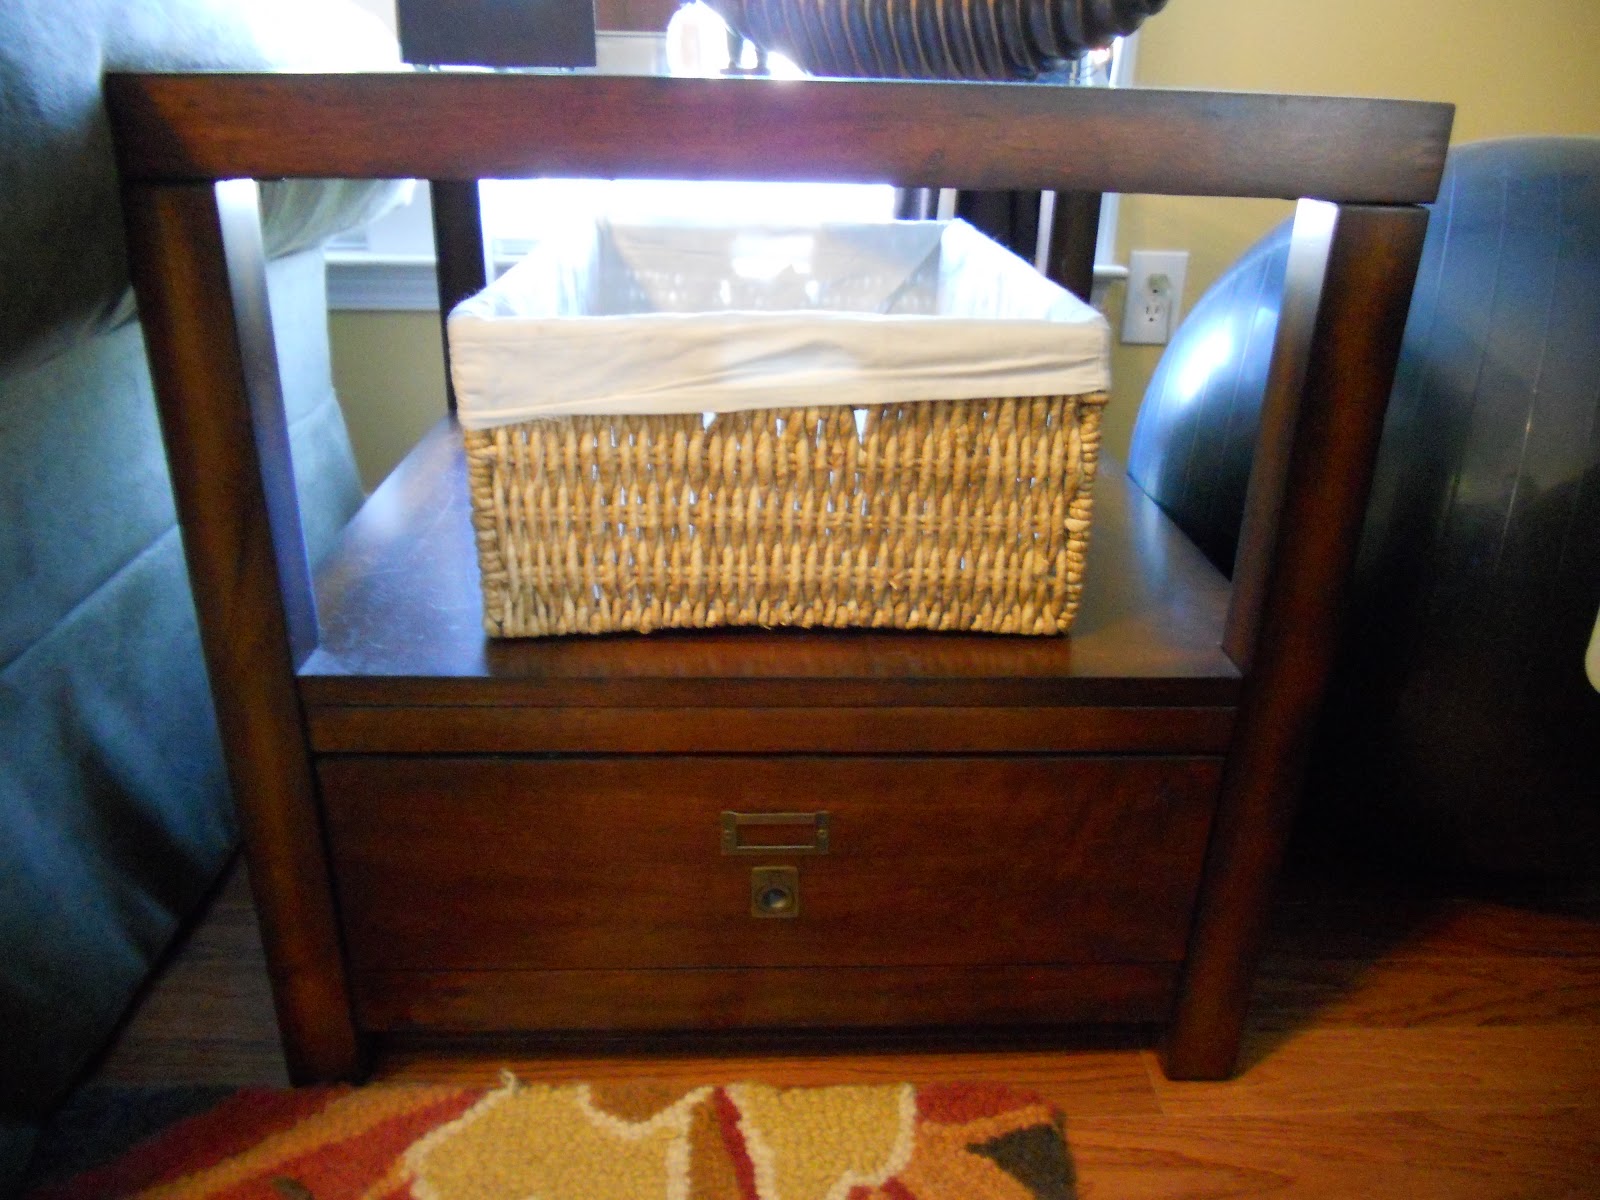
I can't remember how much the END TABLE cost, but we got it for a deal because we bought it from a furniture store that was going out of business and it was one of the last ones they had. It has great storage in the drawer on the bottom and the open space in the middle. One downfall for kids is that it does have a glass top and it is rather large and square so it won't fit just anywhere. 
End Table with open storage (the empty basket is waiting to be filled with diaper and wipes for our little one arriving soon)
I have really found myself nesting recently knowing our little one will soon be here (read more at garyandannac.blogspot.com about our adoption journey. After completing the entryway dresser redo, I decided to change the dining room we never use into a fabulous playroom. I haven't had time to design that, but I will be posting my Dream Design Board for that space soon!! So, the newly added piece to this room is what used to be our entry way table which was then a buffet table and is now a place to store kid items. The top drawers are very shallow, but are perfect for coloring books and paper as well as cards and puzzles. The lower shelves will house movies, games, and toys. This may change once our little one begins to crawl. : ) This piece is now beside the fireplace and the dark wood really adds something to the space. 
Pottery Barn Outlet (A little steep at $400.00, but I just had to have it that  day)

Because I knew that having items out in the open was not going to work with crawling kids or toddlers, I began thinking of new ways to store items such as DVDs that we used to have on open shelving. I found these great trunks at Home Goods on discount one day. I bought two- a large one and small one so they could be stacked. The smaller one on top now houses my husbands cords, controllers and all things gaming. The one on the bottom holds our DVDs. These are a great way to use an item created for one purpose for a new purpose. I am sure these trunks would be great holding picture albums, games and puzzles, blankets, knitting supplies- the list is endless and they make a statement.
Trunks from Home Goods 
The TV is a content source of pain for me unless of course I am watching a great movie on the couch in front of a fire with a cup of hot cocoa. We bought this TV as an open box floor special. It has lasted us a long time. At first, I was completely against a TV so large. Why did we need something so large taking up our precious space? It was after all- UGLY and BLACK and  BIG!! But, my husband kept saying I would like it once I watched movies on it. I hate to say he was right, but I still don't like it being the center of attention in our home. And, I worry it is too low to the floor and not study enough. We will see. For now, it stays and it rests on its TV cabinet we bought at Target. I must say it is a nice piece to have come from a retail store. 
TV cabinet

For additional storage, I used pieces I already had. A basket for blankets, a large wooden bowl that belonged to my grandmother for magazines, a shallow bowl we bought in Jamaica and a box I received as a gift that came with lotion and potpourri (I keep everything!!)
Basket for Blankets
Potpourri Box for Remotes

Wooden bowl for magazines

Wooden bowl from Jamaica for remote
I will be posting a full picture of the living room as whole later on. Remember, anything can serve double duty. Keep everything! Always be on the lookout for items in your home that you can use elsewhere. There are many items that can make a space beautiful, but why shouldn't they also serve a purpose. Be creative and think outside the box. Don't get rid of older furniture, re-purpose it or refinish it and use it in a different space. In a future post, I hope to reveal a huge, square coffee table that I am (with the help of my husband and his tools) going to convert into a train/Lego table for our little one once he becomes a toddler. Someone donated it to us for our Fundraising garage sale and no one ever bought it despite us really pushing it on Craigslist as well. It has two large drawers on the bottom, is low to the ground and has open space in the middle. We are going to replace the glass top with plywood and convert the top into a train table or Lego surface. Don't ever underestimate the potential of a nicely put together piece of furniture. 

Thursday, October 18, 2012

Tired of Yellow Paint

Being an Interior Designer has its downfalls. When I went to school, I was familiar with and liked a certain style and that was the style I grew up with in my home - TRADITIONAL. But, after taking classes in the History of Architecture and the History of Furniture and being introduced to a lot of other styles, I came to the point where I had an appreciation of so many different styles. Learning how to PATTERN MATCH also added to my frustration. I now can look at a fabric or paint color or piece of furniture and see it in any home-- including my own.

So...when we moved into our home and we chose all of the paint colors and filled it with our mainly traditional items, I thought I was set. Little did I know that it wouldn't take very long and I would want to change things up. Of course, anyone knows that changing paint colors and furnishings can be very expensive. In order to change things up a bit, you have to get really CREATIVE and FLEXIBLE.

The changes began when I decided that I was really tired of the YELLOW paint that spread from our entryway to our kitchen and throughout our living room and stairway. I wanted to break up the yellow just a bit. 

Living Room Change 1: Get inspiration from Candice Olson and paint wide STRIPES horizontally across one wall. I really wanted to do this on the fireplace wall, but that wall spreads across to the base of the staircase and I didn't want that area to be the main focus of our living room. So, I opted to paint the one long uninterrupted wall in our Living Room that is behind the TV. I love my perfect stripes and I have to give Kuddos to my perfect husband who used painters tape and a level to tape the stripes on the wall for me to paint. 


  •   Stripe option 1: Paint stripes in a completely different color (still coordinating); our walls were           yellow so I opted for a neutral cream in the same tint as the yellow so they looked good together
  •   Stripe option 2: Paint the wall one color and then paint the stripes in a different sheen, but the same color (this is what Candice did); For example: if the wall is a flat paint, paint the stripes in a glossy sheen. 
BEFORE: Living Room Wall in Painting Process  AFTER: I love the New Wall and the painting is a painting of my two dogs by me
                                        

Living Room Change 2: Paint the fireplace. After painting the stripes, I visited a friend's home and saw her fireplace. It was painted a dark color and it really gave it that old house look. I loved it and of course, wanted to do it in my own home. So, one day while my husband was at work, I tackled the fireplace.My first option of paint was to go to the Behr Historical Registry colors. I didn't find one there that I really liked so I went with Valdspar Blanched Thyme 4001-4A from Lowes. I remembered seeing photos of painted molding around fireplaces and it reminded me very much of a man's library or a room in an old farmhouse. I did some research on this and found that adding paint to these areas began as early as the 1700s. http://www.oldhousejournal.com/magazine/2003/dec/mantels.shtml 


My Fireplace Inspiration for Shelves in Space Planning-- my dream home is a Craftman Bungalow! Sigh!! 

hampton 015 hampton 014
Hampton Mansion - take note of the all over blue walls that are also used on the fireplace. Thank you  http://pigtown-design.blogspot.com/ for the pictures. The picture on the right shows the painting of the molding as well. This is the look I was going for.


I did leave some of the details on the fireplace white and I am planning to go back and use the same neutral cream that was used on the horizontal wall on the adjacent wall. 
BEFORE: Fireplace Surround in White

Fireplace Mantle After 

Living Room Change 3: Space Planning- Inspiration Craftsman Style Living Room with fireplace and built ins. With the baby coming soon, I do realize that my home will not be my own to keep perfectly organized anymore-- but I will do my darndest to have it at organized as possible while still allowing baby the run of the house. Ha! But, that being said, there needed to be space for baby to play. While I have gone through several different plans on this, I think I have found a winner. The dresser redo project (see earlier post under DIY) was originally going to be used in the Living Room for baby's toys. It was perfect and had 6 drawers that could hold all types of things. After I refinished it, I decided to use it in the entryway instead. So, I needed to have another solution for the living room. I rearranged the furniture for the millionth time since we have been in our home and added a few case pieces for storage. The current entryway piece ($400.00 at a Pottery Barn Outlet) was an open piece with two shelves and two very skinny drawers - I am assuming since this was to be in an entryway or used as a buffet that the drawers were for linens and silver because not much else can fit there. I decided the open shelves and skinny drawers lend themselves perfectly to being used for toy storage. I moved the piece into the living room on one side of the fireplace- it fit perfectly and left an opening in front of the gas nozzle which was great. In the top two drawers, I stored items such as playing cards and later coloring books, crayons, paper, etc. On the bottom two shelves, I have stored games and smaller toys for baby. It works!!

I will be posting pictures at a later time and I will also be writing another post on how to have workable, beautiful storage in your living area that also makes it safe for baby. Stay tuned. 
Pictures are  now posted! Yay! Please read my next post on how the SPACE PLANNING is coming along. 

Friday, October 12, 2012

My Home- Paint Choices

When Gary and I moved into our home in 2006, it was a completely blank canvas. White walls!!! Whoo Hoo!!!! I was in decorating heaven!! This was our first home and I wanted it to be great and I wanted it to showcase my talents as a "wanna be designer." Even though I was still teaching, I still had the strong desire to be a designer full time (that dream is now becoming a reality, but more on that later).

Anyway, this was a new build and we purposely wanted nothing done to the inside of the home except the basics. We wanted to choose our own paint colors, tile for the backsplash in the kitchen, etc. on our own as we had the money.

The first thing we did tackle was the painting of each room. Before we even had our move in date, I was choosing paint colors. The DIYers we are, we decided to paint everything on our own. It saved money, but painting is a chore. Phew!! Lucky for us, the move in to the house was earlier than the lease was up on our apartment. So, we actually painted our Master Bedroom and Master Bath before we moved any furniture into the house. Our dining room was painted soon after. Since then, we have painted the downstairs Guest Bath, the Office, the Living Room and Kitchen and the Entryway (the only space we had someone else paint due the the two story walls). We recently painted the Guest Room and we are now working on the Nursery (YAY!!!) and we will tackle the Guest Bath at a later time. I am trying to decide if I want it to look like a Guest Bath or a Kids' Bath. Can't decide just yet.

Well, enough of that before I am off on a tangent. Here is a list of all of the paint colors we chose with a picture of the rooms. DISCLAIMER: Some pictures may be scary and are not a true reflection of my plans for the spaces shown. My home is a complete work in progress and some spaces have been changed several times. Ask my husband how he feels about that?? I had the Living Room furniture laid out in a nice way where the TV was not the center of attention and he complained he could not sit on the couch and play his video games without getting a crick in his neck. So....the couch is now moved for the millionth time to accommodate the ever present black hole we call a TV that can only rest on the one wonderful uninterrupted wall we have in our living room. Sigh!!

Okay-- so here are our paint colors for our home. I waver between back to nature, vintage and modern somewhat. I am rather eclectic in my tastes, but I think our home is moving more toward the vintage at this point.

How I choose a paint color: When I decide to paint a wall in our home, I go to the paint store and I pull every single paint chip that I have even the slightest positive reaction to that is in the right color family. I then take those paint chips home and tape them to the wall where I will be painting. I make sure to cut any white from the edges and separate the paint colors into individual pieces. This helps to ensure that I am looking at the color in its purest form. I then leave those paint chips up for a while, looking at them each in every light from morning to night. Every once in a while I will pull one down. In the end, there are a few left and I make my final decision. Then I am happy!!

When choosing paint colors for your home, you also need to somewhat coordinate between rooms that flow into each other openly. This doesn't mean the SAME color, but you do need to watch TINT (adding white to a color) and SHADE (adding black to a color). Paint choices should coordinate in color and tint or shade just so they flow together from room to room.
  • Entryway: Out entryway is two stories and leads into our dining room with an opening in the wall- no doors. The lower half of the wall is WHITE WAINSCOTING and the Upper portion of the wall is painted with BEHR S-G-790 BEAR RUG. This dark brown color took me a very long time to choose. I knew I was taking a chance doing something so dark, but with the light from the upper window and all of the white from the dining room, I went for it. To choose this color took a while because I did not want any brown that was reddish in tone. 
Entrway Paint Color 

  • Guest bath downstairs: Valdspar 3004-10A Cliveden Leather I really like this color, but want to do something more in this space with the walls. Perhaps some stenciling. This color is on the National Trust for Historic Preservation List. I love colors on this list. There is just something about them. 

  • Dining Room: BEHR 500F-6 Hallowed Hush 
Dining Room with our first DIY piece- the table and chairs

  • Kitchen: This color took a while to choose. This space runs into our living room so I wanted colors that coordinated. I decided to paint both spaces the same color. SW6373 Harvester. This was the one time I spent money on Sherwin Williams paint. Typically, I go with Behr. But, I loved this muted yellow color. 
This is the same yellow as in the Living Room, but looks lighter in the daylight. This also shows the tile we chose from Lowes -- it was on sale and came with discounted labor costs!!
  • Living Room: SW6373 Harvester; After a while, this color actually became overwhelming so I added HORIZONTAL STRIPES to the Harvester. Thanks to my husband's beautiful and very OCD lines, these turned out PERFECT. For the STRIPES, I used VALDSPAR CRAFTED WHITE 3007-6C. The fireplace was painted later with BLANCHED THYME 6001-4A
Fireplace Appears as a Black Hole
New Fireplace


  • Master Bedroom: I don't really care for our Master Bedroom color, but we haven't had time to redo it yet. I do love the accent color, but... three walls are BEHR BELVEDERE CREAM 770C-2 and the wall behind our bed is BEHR 480F-4 MERMAID NET 
This was soon after Move In Day- It looks much different now, but you can see the colors.  The walls are going to be repainted one day because I don't like the cream color -- too light for a bedroom.

MASTER BEDROOM UPGRADE COMING SOON 2014
  • Master Bath: BEHR 480F-4 MERMAID NET

SEE THE ALL NEW UPGRADED MASTER BATH {Master Bath Update}

  • Office: The space I gave up control. This was Gary's space and it actually turned out great! Colors used: MISTY SURF 740E-2; HERBAL MIST 440E-2, OCEAN VIEW 560D-5, AND SEVEN SEAS 560D-6 
The Master's Taping Skills (Gary) 
Office Finished Wall (Ignore the mess)
  
  • Guest Room (BEFORE): BEHR COLORSMART GREEN ENERGY UL210-17
Guest Room Before the Change (this room is now the nursery) See Below. 

  • Nursery: See the nursery {Nursery} Paint colors used- My mom suggested using this room as a nursery since I already had the green wall. It made a perfect background for the mural. Thanks, MOM!!! Background Colors: BEHR COLORSMART GREEN ENERGY UL210-17; Stripes BEHR EMINENCE 550E-2 (blue color). The Mural colors included various paint samples and colors I already had from other projects. This room used to be the guest room with the green wall.


  •  Guest Bedroom: I am sorry to say I do not know the name of the color we used in the Guest Room. I will post the name of one that is most likely it. We bought this in the Oops Bin at Home Depot and I love the color. It didn't have a name and when we went to buy more, they had to color match it : ( It is very similar if not the same color as BEHR LION 760D-4
PICTURE TO COME SOON