Friday, April 19, 2013

Pantry Organization and One Happy Mama

Untitled Document
When my friend told me she needed help with her pantry organization, I was excited (I know, I know only a person with my personality would be excited about cleaning a pantry!)

Immediately, my wheels started turning.

Client background: Mother of four children who shops at Costco
Current pantry issues: small pantry with limited space for large items purchased at Costco, wire shelving, Dry goods are in plastic bags

Needs: Specific spaces for kids' snack items and breakfast/lunch items; specific space for the homeowner's baking items, specific space for the homeowner's bread baking supplies (She mills her own wheat and corn and makes the most heavenly homeade baked goods you have tasted!!), a spice rack for her many spices she uses in cooking and baking

Steps to an organized pantry: 
It is important to note here that you want a full pantry when you begin this process. The homeowner had just made her monthly trip to Costco so the amount of items in the pantry was realistic to what the pantry would hold on a normal basis. If you try to organize your pantry when it is empty, you won't have adequate storage for when it is full. 

  • Clean out the pantry completely and sweep/mop/wipe down shelves
  • Measure Width, Depth and Height of shelves (you will need these dimensions when shopping for containers- you want them to fit adequately) **This pantry's shelves were 16" deep and 13 3/4" tall; the width was one door space or 36"
  • Organize items on a large table or space in the kitchen (put into categories)

  • Make a chart of the different categories and come up with a solution for each **IMPORTANT: MAKE NOTES OF THE SIZES OF ITEMS YOU ARE BUYING CONTAINERS FOR- IF THE BOX OF OATMEAL IS FROM COSTCO, IT WILL NEED A LARGER CONTAINER THAN ONE FROM A REGULAR GROCERY STORE
  • Go shopping for the storage solutions


Item
Size
Solution
Spices
Various
Hanging spice rack (pantry door)
Cereal

Tall containers with a pour spout
Oatmeal

Tall containers with a pour spout
Kids snacks/crackers/granola bars

Flat containers with snap lids
Snack crackers
24 oz

Cooking oils/sprays

Lazy Susans


Canned goods

Stacked shelf for cans
Potatoes/onions

Stackable/breathable bins for the pantry floor
Grab bags of potato chips for kids’ lunches
Single serving size
Large open bucket for the pantry floor (owner already had this in place)
Pasta


Condiments like mustard, hot sauce, etc.

Lazy Susan
Breakfast condiments like syrup, honey and jam

Open basket with handles (owner already had this)
Lunch items

Peanut butter
Baked Bread items

Large Bowl for all of the labeled bags
Baking items (coconut/nuts/chocolate chips/Sprinkles
Chocolate chips 56 oz
Large clear container with lid
Baking Cups

Tall container with lid
Food Coloring

Tall container with lid
Brown rice

Large Tupperware bowl (homeowner already had)
Popcorn

Container with lid
Large bag of chips
28 oz
Tall container with pour spout


Some of the solutions we purchased: 
Copco Non-Skid Cabinet Organizer
Mainstays Large Cereal Dispenser
For Oatmeal, Cereal and Chips
Canned Goods
(bought one much like this with movable steps)
14-Piece Kitchen Shelving System
Stackable Bins
Hanging Door Storage
14 Piece Shelving System


BEFORE:


AFTER:

More AFTERS:

Stackable flat containers are great for
snacks and granola bars.
See through shoe box containers are also great.
 
Granola Bars

Large Containers with Spouts were used
for cereal and oatmeal to prevent torn boxes and bags.
The clear containers also help you see your supply.

Baskets were used for breakfast items such as syrup/honey and a
Lazy Susan was used for other condiments.
This helps prevent sticky shelves.

Always store potatoes and onions
separately in a dry place

Overall, this pantry redo was a success. A few more containers for loose items and labels will be added. The homeowner commented to me the day after saying it was much easier to prepare breakfast and lunches for her family now that she knows where everything is. That made me happy!!


Thursday, April 18, 2013

Much Needed Office Overhaul

I posted in my previous post which featured Clever Container's OTD Pantry Organizer that our office needs a really big overhaul when it comes to organization.

I LOVE the paint job that my husband did and I do love our IKEA furniture, but there are too many things going on in this office for it too be very productive. I will admit-- you heard it here-- that our office tends to have several piles of paper and books and craft supplies at any given time. Things that are piled on the floor because there just hasn't been a system put in place so that these items have a home.

Here is a picture of my husband's meticulous paint job--


Work in Progress- Meticulous measuring and taping by my talented husband (paint choices and design by him)


A picture of the finished product (will try to post a much better straight on picture at a later date)


The furniture we have in the room now (we also have a drafting table and two drawer file cabinet): 


EXPEDIT Shelving unit IKEA Finished on all sides. Can also be used as a room divider.
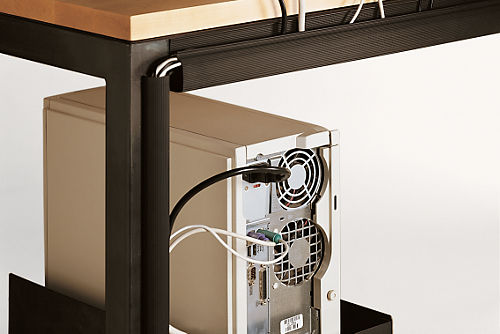
FREDRIK Desk IKEA Cable shelf under the table top keeps power strips and cables out of sight and the work surface clear.
EXPEDIT Shelving in Birch
FREDERICK Desk in Birch
BILLY Bookcase with doors IKEA Adjustable shelves can be arranged according to your needs. Adjustable hinges; adjust vertically and horizontally.
Sterilite 5 Drawer Storage Cart White Set of 2
BILLY bookcase in Birch 
A Cart like this with one additional large drawer

Storage Already in Place:
IKEA magazine files
IKEA storage boxes
As you can see, we have a lot of storage pieces, but they are mainly  open pieces so everything that is on these pieces is open. This works because you can see what you have, but it also leads to open clutter for everyone to see. 

Issues in our office now: Lack of storage space for papers, open storage where items tend to pile up, open desk with no drawers for storage of office supplies, Small file cabinet, Cords in view, Tons of books and crafting supplies

Office Inspiration/Steps to a functional office:

1. Make use of vertical storage
Cozy Work Space


2. Space Planning for Best Use of Space
Perfect Office Setup
Like the Arrangement of Furniture
{Source}


3. Add storage solutions that are FUNCTIONAL as well as hide clutter and offer a little punch of design

Clever Container Items to Use: 
-Sophisticated File Tote to house items from Clever Container Business: This tote is sturdy and has handles so it is easily moved (comes in pink, red and black); I can also print and file blog ideas in this tote


-Document Boxes: to store papers in categories
                            a. Bills to be paid
                            b. Papers to be filed
                            c. Follow up papers
                            d. Important receipts
                            e. People to touch base with (cards, gifts given, thank you cards
                                I need to write)


-3 Drawer Vanity: To hold small office supplies that are always needed such as stapler, tape measure

-Double Duty: these will fit into the IKEA cubby shelf and can contain additional art supplies such as wooden letters and smaller canvases out of site


-Case by Case: these boxes come in a turquoise blue and would look great on the open shelving to help add interest to open bookshelf


4. Cord Control
Balt Cable Management Tray (Pack of 2) SIGNUM Cable management, horizontal IKEA Collects your electric and computer cables together; makes it easier to keep your work area tidy.
{Purchase} {Purchase} {Purchase}


TO DO LIST: (I will post pictures of Before and After once this process is underway)

1. Go through magazines (I have a ton) and clip ideas that I will use later and toss the rest of the magazines that I won't use 

2. File ALL paperwork that needs to be filed and toss the rest

3. Add more folders in file cabinet for new needed categories

4. Add shelving inside of closet for all of the craft supplies and items we don't use that often 

5. Go through books and items on bookshelves and purge what we don't need

6. Add vertical storage in the form of floating shelves on the wall behind the desk that isn't being used 

7. Rearrange furniture if needed

8. Purchase a small (and cheap) writing desk for me to work on (we currently share the one desk-- it gets crowded and messy fast) DONE see my DIY blog post on Refinishing the Desk from Craigslist 


Stay tuned for our office update coming soon. As soon as the desk is completely refinished, I will get in the office and get it in ship shape!! 

Friday, April 12, 2013

Let me help you become a part of a great team of women!!!

I have said before that I LOVE working for Clever Container. Not only are the products wonderful, but the company is wonderful to work for. If you read this blog and you are absolutely in LOVE with Clever Container and our products, contact me!! I am able to give you additional information, answer questions you may have and sign you up! Easy peasy!!

Since I began with Clever Container, the support and training I have received has been incredible. We have a team that works together offering advice, photos, support and motivation. The company also provides mentors to its consultants as well as weekly and monthly training.

The best thing of all is that finding leads is something else the company helps you with. Each month, I receive emails from Home Office with names and information on people who are interested in Clever Container whether it be for product, catalogs, or wanting to become a consultant. That speaks volumes as to the company and their mission statement.

Clever Container Company is dedicated to helping people take control of their lives (1) by providing high-quality, innovative and functional tools—along with practical techniques and useful information—for organizing the world around them and (2) by offering business opportunities to motivated individuals who share our belief that an organized environment can lead to a more productive, fulfilling life for each of us.


Clever Container also offers incentives for their consultants from Day 1. The first 90 days is called your Fast Start period or RSO. 

First 30 days

Sell $600 and you will earn the following for FREE!! 

Case By Case ($20/Set of 3)
Chrome Plastic Bag Recycler ($15)

Great Divide ($14)
               

Sell $1200 and you will earn the following for FREE!! 

Double Duty ($30/Set of 2) 
Sophisticated File Tote ($66) 


First 60 Days

Sell $600 and you will earn the following for FREE!! 

WonderFull Bag ($40) 
Pretty Pen ($10)


Sell $1200 and you will earn the following for FREE!! 

Wire Dividers Chrome ($17)
Purse File ($20)
OTD Pantry Organizer ($30)
        

First 90 Days

Sell $600 and you will earn the following for FREE!! 

Handle It ($25)
Bin There ($24/Set of 3) 


Sell $1200 and you will earn the following for FREE!! 

Clever Container Tabletop Display Banner-- $85 Value 


You really don't need to keep inventory with Clever Container. You buy your kit for $149 plus S&H at $25. It arrives on your doorstep very quickly and you get started. 

The other items you earn as you go by hosting parties of your own or holding workshops or doing Vendor fairs. By holding parties open for yourself, you are then able to get some additional products to show people when they ask about them. 

It would have been a money saver for me to be able to complete the RSO period. I would have had we not been in the middle of our adoption. I had to cancel all of the Vendor Events and parties I had scheduled during my RSO period. 

But, I could not think of a better reason for me to have missed my RSO period- our beautiful son. 

For you, the RSO period is obtainable. These items are so great and the fact that the company gives them away to help their consultants succeed is GREAT! 

Monthly specials and incentives also help with sales!!

Contact me today for more information!! If you love organizing and helping people become organized- this is the company for you!!


Wednesday, April 10, 2013

April and May are Appreciation Months for Teachers, Secretaries and Nurses

Did you know that April and May are Appreciation Months to celebrate some very important people in our lives?

As a "retired" teacher, I know that it is a tough job with long hours and at times goes unappreciated.  Much of a teacher's appreciation comes in the form of students who are succeeding and improving or in the smiles they receive from their students each day.

For one week each year-- April 6-10-- there is time set aside to let those teachers in your life know they are appreciated.

Other appreciation days set aside this month are Secretary's Day on April 24.

May brings Nurses Appreciation and May 12 is Mother's Day.

Don't get caught without that special gift for that special person.


Thursday, April 4, 2013

New Project: Office Desk Redo

I am so excited to have found this desk. Our office is slowly becoming filled up. After creating Declan's nursery and cleaning out our guest room, the space has become limited. Our office space is also limited as we use this room for storing books on anything computer related for Gary and anything Home Design for me. We also have magazines for reference and craft supplies which include paint, canvases, wooden letters, ribbon, you name it we have it stored here. This is all on top of the already needed office supplies, file cabinet and Clever Container business items for me. Phew!!

So, the first step in downsizing and organizing this space included selling my desk which had already been moved to the guest room. This didn't have any function for guests at all so it was sold.  So, the decision had to be made- do we only have one desk in the office or do I find a small one just for my business purposes? After looking at my pile of files and business supplies on the floor, I decided to search for a small writing desk with drawers for storage.

This is what I found. I knew I could refinish anything I got, but I didn't want something too bad off. I settled for this desk. The drawers all operate smoothly, it is made of real wood and I have a vision already in my head of what it will look like finished.

Here are the before pictures:


You can see that there are some pretty damaged places on the desk top, but the rest of the desk is in great condition. After stripping the top, I found that many of the scratches were superficial and only through the paint. There are a couple of spots that will need patching and sanding before I stain, but it is doable.

Just like my dresser redo, the top will be stained a dark Ebony and the body will be painted with Valspar Sonora Rose 2002-3B. I fell in love with the color immediately. I also want to play around with stenciling patterns on this project as well as covering the pulls I saved from my dresser redo with fabric.

Stay tuned!!

Update on this dresser redo: I did follow through with most of my plans on this project. After painting the dresser with the rose color though I didn't like it. However, it will stay this color until I have the time to repaint it. It still isn't completely finished, but I am posting some of the photos of part of the finished project. Sometimes, if I start on a project and begin to dislike it half way through I get discouraged (bored) and move on to greener pastures so to speak.

Almost Completed 


Not happy that the wood filler I used that was supposed to be stainable really didn't work that great


Inspiration for the Painting (Thank You card from a friend)